
Digging and Excavations
Collecting artefacts from the ground often provides clues about what lies beneath the surface and helps archaeologists plan excavations. However, the only way we can really know what it going on is to dig!

An example of a test pit Dr Diane has dug
Page Content
Excavating the Past
We dig, or excavate, to discover and collect artefacts and other materials from beneath the ground. In doing so, we can get an idea of what sorts of activities were carried out in the place during a particular period in the past and how those activities changed through time.
Excavation is both destructive and expensive though, so we are careful to excavate slowly and carefully taking lots of notes, drawings and photos.

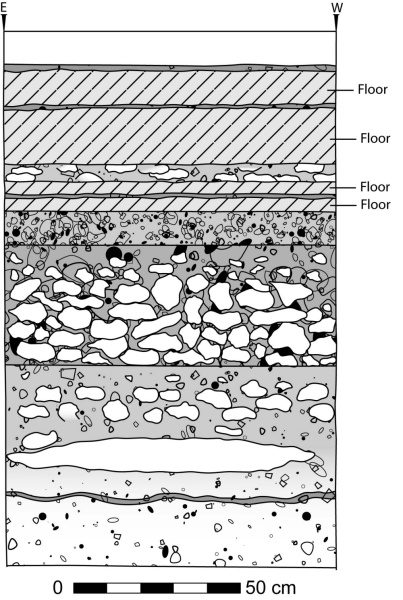
A drawing of the test pit above
Digging is also really important as this is where we find the best preserved remains and in their context. It is just as if not more important for the archaeologist to see where the artefacts came from, what surrounded the artefacts be it dirt, stones, other artefacts or a floor. This is called the context. When you have the context you can say so much more about the objects.
Excavation Techniques
There are a variety of ways you can excavate depending what you want to find out. Usually you start with a grid square 1 x 1 m and then if you find anything of interest you can expand to 2 x 1 m or 2 x 2 m. Sometimes if we find the front walls of building and want to follow them we will add a trench, which is a bigger pit that is long but not so wide, for example 1 x 4 m long.
An example of an excavated test pit
All the soil that is removed is screened, that is put through a wire mesh so that the dirt falls through and smaller things that maybe our eyes would have missed, like seeds, stay in. After this we wash all the artefacts and label each one with a unique number to identify where they came from.
Children’s Activities
School Excavation
By actively engaging and challenging pupils in a real-life excavation through teamwork, they will gain an understanding of the methods of historical enquiry that is much more likely to be retained. The skills of critical thinking and observation can also be transferred across other areas of the curriculum.

Dr Diane showing school children how to excavate
The Activity Highlights:
Pupils will explore:
- The difference between physical evidence (artefacts) and the interpretations or inferences we make from them
- The importance of context in archaeology, and why looting and removing objects without recording is so damaging
- How our understanding of the past is incomplete and can be influenced by different viewpoints
This activity uses a generic culture, allowing pupils to focus on the core principles and techniques of archaeology rather than specific historical knowledge. However, it can easily be adapted to reflect a particular culture or historical period, depending on curriculum focus, pupil age and available lesson time.

You will need a selection of objects that represent aspects of daily life in an ancient community. These should be chosen carefully to support the learning objectives and enable pupils to answer the questions set during the activity.
Suitable materials may include everyday items such as broken and complete pottery, pieces of fabric with patterns, beads, seeds, dried fruit, nuts, snail shells and similar objects. If the activity is linked to a specific history topic, objects can be selected to match that period.
Many items can be sourced from around the home, with additional materials easily and cheaply obtained from charity shops.

Site Preparation and Set-Up
- Select an outdoor area within the school grounds that is grassed, preferably flat, and free from obstructions. If level ground is not available, the activity can be carried out on a slope, with the understanding that the excavation square will be at an angle.
- Ensure the space is large enough to accommodate 1 × 1 metre test pits, with at least 2 metres of working space around each pit. Check in advance that there are no underground services such as electrical cables or water mains in the area.
- Depending on adult support available, three to four pupils can work on each test pit. A maximum of 16 pupils (four test pits) is recommended at any one time, so the activity may need to be repeated for the rest of the class.
- To create each test pit, measure out a 1 × 1 metre square. Check the diagonal (hypotenuse) measures 1.41 metres to ensure accuracy. Place a stake at each corner and run string around the stakes so the excavation area is clearly defined. Two pegs can be placed behind each stake to help keep the string taut. A line level may be used if you wish pupils to measure the depth at which artefacts are found, ensuring the string remains level.
- Remove between 20 and 50 cm of soil, depending on soil hardness and the physical ability of the person digging. This should be done using a shovel and supervised at all times.
- The excavated soil can either be reused or kept to one side for backfilling at the end of the activity. However, soil containing many stones or twigs can be confusing for pupils, so it is often clearer to replace it with potting soil.

- Each test pit represents the foundations of an ancient house. Pupils must interpret the evidence to decide which part of the house they are excavating, such as a kitchen or sleeping area.
- Populate each test pit with artefacts that match a specific scenario. For example, one pit represents a kitchen area, another a midden (rubbish pit), and another a burial that has been looted. Artefacts should be selected accordingly to support discussion and interpretation.
- With the exception of the looted test pit, ensure that the soil is packed down firmly to reflect undisturbed archaeological contexts.
Creating the Archaeological Scenario
The Mystery Beneath Our School! A Class Archaeology Challenge
Something exciting has happened near your school! Builders clearing land for new houses have discovered the remains of an ancient building. Local records say that a group called the ******** people (your school name spelled backwards) lived here around 1,000 years ago.
When archaeologists explored the building site, they found pieces of pottery, food remains and hearths, which were places where people cooked their meals. This suggested that some areas were kitchens. They also discovered middens, which were rubbish pits filled with seeds, broken pots and stone tools.
Even more exciting, they uncovered a burial of a woman wearing colourful bead necklaces and special shells that came from far away. This tells us she may have been important. Her clothes had mostly disappeared, but it looked like she had been wrapped in bright fabrics.
The archaeologists now believe there could be more remains hidden under your school grounds. They came yesterday and set up three test pits, ready to dig. But before they could start, they were called away to help on an emergency excavation in Manchester.
Last night, however, some naughty people sneaked onto the school grounds and started digging one of the test pits. They took some objects and left the pit in a mess. Luckily, Dougal the school guard dog scared them off, but the damage was done.
Now the archaeologists need your help! They want you to excavate the test pits and rescue whatever is left. People all over the country want to learn about the ********* culture. Are you ready to become archaeologists?
Part 1 – Excavation
You will work in teams, and each person will have an important role:
- The Excavator digs carefully
- The Sieve Manager screens the soil and bags finds
- The Recorder takes photos and fills in the record sheet
Everyone will get a turn at each role.
Before you begin, your teacher will explain:
- Why archaeologists dig test pits
- What layers of soil (stratification) are
- How to dig, sieve, record and bag finds properly
Remember, archaeologists do not dig just to find objects. They dig to understand how people lived.
Now the fun begins!
You will start with the looted test pit. Look carefully and discuss:
- What part of the house do you think this was?
- What do you think was taken away?
- What do the remaining objects tell you about the people who lived here?
While digging:
- One person digs
- One records and takes photos
- One sieves the soil and bags artefacts
When an artefact is found, digging stops. A photo is taken, the record sheet is completed, and only then is the object carefully removed.
As you dig, keep asking yourselves:
What room might this be? What clues do the artefacts give us?
Part 2 – Analysis and Interpretation
- Once the excavation is finished, you will head indoors to examine your finds.
- Each child chooses an artefact
- Measure it, draw it and describe it and think about what it might have been used for
- Then discuss these questions as a group:
- Which part of the house were you excavating? Why?
- What do the artefacts tell you about daily life?
- What did these people eat, wear or make?
- What else might have been there but has disappeared over time?
- Why is looting such a big problem for archaeologists?
Part III – Reporting Your Discoveries
- Now it’s time to share your findings.
- Write up your conclusions as a group
- Present them to the class
- You could turn your report into a news article.
Important Things to Remember
- Loose soil is easier to dig, which is why the pits are prepared first. In real archaeology, archaeologists start with no idea what is underneath.
- Always scrape the soil gently with the trowel instead of digging deep holes.
- If it rains, the pits must be covered because wet soil is heavy and hard to dig.
- Artefacts should be chosen carefully so they help tell a story about the past, not just random objects.
Resources by Dr Diane
Archaeology Wordseach

Live Q&A with Dr Diane
Meet Dr Diane live! Children and teachers can chat with her in real time and ask questions about her exciting life as an archaeologist and her amazing rainforest discoveries.
